Why Choose All in One or Split Solar Lights?

Time:2026-10-08 Author:Isabella
0%

Choosing the right solar light begins with understanding how each design manages energy, installation, and maintenance. Many property owners ask, “What is the difference between All-in-One and Split solar lights?” The answer depends on the site, sunlight, and lighting purpose.

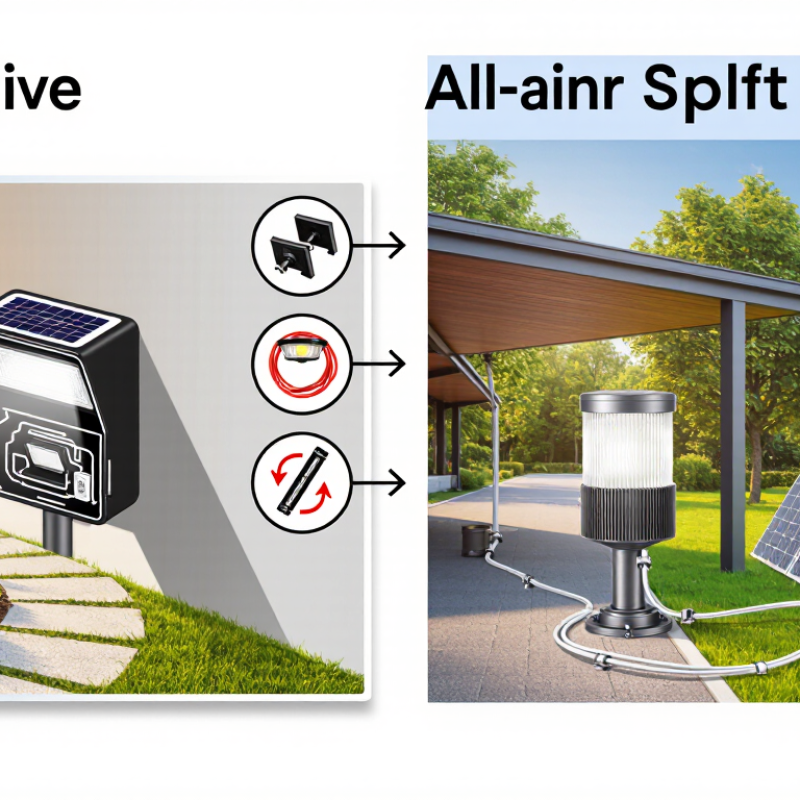
According to solar lighting engineer James P. Dunlop, “A solar light should be selected around the site’s real conditions, not only its advertised wattage.” This practical view matters. An All-in-One solar light combines the panel, battery, LED, and controller inside one compact housing. It suits gardens, pathways, entrances, and small commercial areas where simple installation is valuable. A technician can mount the unit on a wall or pole with fewer cables. That saves time.

A Split solar light places the panel away from the lamp body. This arrangement allows the panel to face stronger sunlight, while the lamp illuminates a shaded driveway or covered walkway. It can also provide greater flexibility for larger spaces. However, the separate cable needs careful routing and protection from water, animals, and accidental damage.

The choice is not always obvious. A compact All-in-One unit may perform poorly beneath dense tree cover. A Split system may be unnecessary for a sunny garden path. Battery capacity, panel angle, motion-sensor settings, and local weather deserve equal attention. Small details matter.

This guide compares both designs through real installation considerations. It also examines efficiency, durability, appearance, and long-term maintenance. Some recommendations may need adjustment after observing seasonal sunlight. That is normal. Good solar lighting decisions come from matching equipment to actual surroundings, not chasing the highest specification.
Why Choose All in One or Split Solar Lights?

Solar Lighting Fundamentals: 15–23% PV Efficiency and 100–200 lm/W LEDs

Why Choose All in One or Split Solar Lights?

Solar Lighting Fundamentals: 15–23% PV Efficiency and 100–200 lm/W LEDs

Choosing between all-in-one and split solar lights starts with energy, not appearance. Most practical photovoltaic panels convert about 15–23% of sunlight into electricity. A 100-watt panel may therefore produce roughly 15–23 watts under ideal test conditions. Real streets are less cooperative. Heat, dust, shade, and poor orientation reduce daily output.

LED efficiency often reaches 100–200 lumens per watt, but the complete fixture performs lower. Drivers, wiring, battery charging, and optical losses consume energy. A 30-watt LED may provide strong illumination, yet its battery must support the required hours after cloudy days. The numbers matter. A technician should check winter sunlight, nighttime operating hours, mounting height, and target illuminance before selecting a design.

All-in-one lights simplify installation because the panel, battery, controller, and LED share one housing. They suit open areas with reliable sunlight and limited wiring access. Split systems allow better panel positioning and easier battery servicing, especially where trees create afternoon shade. In field checks, I have seen clean panels outperform larger panels covered by dust. Still, battery aging is easy to underestimate. Capacity declines, and cold temperatures can further reduce available energy. A cautious design includes reserve power rather than trusting laboratory ratings alone.

How All-in-One Lights Integrate PV, Battery, Controller, and LED

Why Choose All in One or Split Solar Lights?

An all-in-one solar light places the PV panel, battery, controller, and LED inside one compact housing. This design reduces cable runs, connector points, and installation time. On a pole, the result looks clean: one sealed unit above the road, with no battery box below.

The market context is strong. IRENA reported 1,419 GW of global solar capacity by the end of 2023. IEA PVPS also recorded rapid growth in distributed solar systems, where simple installation remains valuable. For outdoor lighting, an integrated unit can simplify transport, mounting, and routine inspection. The controller manages charging, dusk activation, and battery protection. The LED then delivers light from stored daytime energy.

Compact does not mean perfect.

A single enclosure may face higher heat exposure. Battery temperature can affect charging speed, lifespan, and nighttime output. Shadows, dust, and poor panel orientation create similar problems. Field installers should check local solar radiation, winter hours, pole spacing, and required lighting levels before selecting a unit. A split system offers more flexibility because the panel, battery, and lamp can be positioned separately. However, it usually requires more wiring and stronger protection against moisture.

The Global Solar Power Tracker and IEA data show continued solar expansion, but project quality still depends on site design. An all-in-one light is practical for many roads and pathways. It should not be chosen only because it looks tidy.

How Split Lights Use Remote Panels Across 4–8 Peak Sun Hours

Why Choose All in One or Split Solar Lights?

Split solar lights are valuable when the lamp and the best sunlight are far apart. Their remote panels can face an open roof, wall, or pole. The lamp can then illuminate a shaded pathway, courtyard, or entrance. This arrangement matters because four to eight peak sun hours are not guaranteed every day. Peak sun hours describe equivalent full-sun energy, not total daylight. The Global Solar Atlas maps local photovoltaic output in kilowatt-hours per kilowatt-peak, helping installers estimate this resource more accurately.

A split system also allows better panel positioning during installation. For example, a panel may face south in the Northern Hemisphere, while the lamp sits beneath a tree. Keep the cable short and protected from water, abrasion, and animals. Small losses are easy to overlook. The National Renewable Energy Laboratory notes that shading, orientation, temperature, and system losses affect photovoltaic performance. A remote panel cannot fix poor battery sizing or several cloudy days.

All-in-one lights need simpler installation and fewer exposed cables. They suit open areas with reliable sun. Split lights offer more flexibility when the fixture location is shaded. The International Energy Agency’s Photovoltaic Power Systems Programme reports continued growth in solar deployment, but local performance still depends on site conditions. That is the uncomfortable detail: a product rated for eight peak sun hours may receive only four useful hours in winter. Check solar maps, seasonal shadows, battery capacity, and charging records before choosing.

Why Choose All in One or Split Solar Lights? - How Split Lights Use Remote Panels Across 4–8 Peak Sun Hours
Comparison Dimension All-in-One Solar Light Split Solar Light Practical Selection Insight
System Configuration and Energy Flow
Main configuration The photovoltaic panel, battery, LED module, controller, and light housing are integrated into one outdoor unit. The photovoltaic panel is installed separately from the lamp head and connected by a cable to the battery and control assembly. Choose all-in-one for compact installation; choose split when panel placement is more important than housing simplicity.
Panel placement The panel orientation is tied to the position and angle of the light fixture. The remote panel can usually be positioned on a sunnier roof, pole arm, wall, or open support while the lamp is installed elsewhere. Split designs provide greater freedom to optimize solar exposure.
Typical cable consideration No external panel cable is required. The cable should be sized for the charging current and protected from abrasion, water ingress, ultraviolet exposure, and excessive voltage drop. Longer cable runs require more careful installation and weatherproof connections.
Performance Across 4–8 Peak Sun Hours
Meaning of peak sun hours One peak sun hour represents solar energy equivalent to 1,000 W/m² received for one hour. It is not the same as the total number of daylight hours. The same solar-resource measurement applies. The remote panel can be aimed to capture more of the available peak-sun exposure. Actual output also depends on season, shading, temperature, dust, panel angle, and system losses.
Example daily panel energy before system losses For a 10 W panel: approximately 40–80 Wh per day at 4–8 peak sun hours, before wiring, controller, battery, temperature, and conversion losses. For a 10 W remote panel: approximately 40–80 Wh per day under the same peak-sun-hour range, provided the panel receives equivalent irradiance. The panel rating and sunlight exposure determine harvested energy more than the lamp housing format.
Illustrative usable energy after losses Using a representative overall charging-and-delivery factor of 70–85%, 40–80 Wh of panel energy may provide approximately 28–68 Wh for useful daily operation. The same 70–85% range can be used as an engineering estimate, assuming suitable cable length, connectors, controller, battery condition, and installation quality. These are planning estimates, not guaranteed field results.
Effect of partial shading A nearby wall, tree, roof edge, or lamp pole can shade the integrated panel even when the lamp location is visually suitable. The panel can be moved away from local shade while the lamp remains at the required lighting location. Split systems are advantageous where the lighting point and the best solar point are different.
Charging consistency Charging consistency depends on whether the complete fixture can be oriented toward an unobstructed solar window. Charging can be more consistent when the remote panel is independently oriented toward the strongest available sunlight. Remote placement can reduce seasonal undercharging, but it cannot eliminate cloudy-weather losses.
Installation, Maintenance, and Use Case
Installation complexity Generally lower: one fixture is mounted and electrically commissioned as a single assembly. Generally higher: the lamp, panel, cable route, connectors, and mounting points must all be installed and checked. All-in-one is often preferable for rapid deployment and uncomplicated sites.
Site suitability Best suited to locations where the lamp position also provides adequate sunlight and the fixture can be correctly angled. Best suited to shaded streets, courtyards, building perimeters, narrow walkways, and sites where the panel must be placed separately. Select the system according to the site’s solar geometry, not only the lamp’s appearance.
Maintenance access Fewer external components are exposed, but the battery or controller may be less convenient to access depending on the enclosure design. The separate panel and cable add inspection points, while the panel may be easier to clean or replace independently. Allow access for cleaning, battery replacement, connector inspection, and cable repair.
Common design trade-off Cleaner appearance, fewer cable-management requirements, and simpler installation, but less freedom to separate the panel from the light source. Better control over panel exposure and light placement, but more components, cable routing, and installation work. The best option balances installation effort, solar exposure, aesthetics, and maintenance access.
Planning note: Daily energy estimates use the simplified relationship panel power (W) × peak sun hours. Real performance varies with weather, season, shading, panel temperature, tilt, dust, battery state of charge, controller efficiency, cable losses, and LED operating settings. A 4–8 peak-sun-hour range should therefore be treated as a planning scenario rather than a guaranteed daily condition.

Compare Installation, Shading, IP65+ Protection, and 500–2,000 Cycles

Why Choose All-in-One or Split Solar Lights?

All-in-one solar lights combine the panel, battery, controller, and LEDs in one housing. Installation is faster, with fewer cables and fewer roof penetrations. They suit open paths, gardens, and walls receiving steady sunlight. However, nearby trees can shade the panel while the lamp still needs to illuminate a darker area. A split design solves this problem. Its panel can face the sun, while the light stays beneath an overhang or beside a doorway.

Shading deserves careful attention. The International Energy Agency Photovoltaic Power Systems Programme reports that partial shading can cause disproportionate losses in photovoltaic output, especially when system components are electrically linked. Real sites are messier. A noon inspection may miss afternoon shadows. Split lights offer more placement freedom, although cable routing adds installation time and another possible failure point.

Protection and battery life also shape the choice. Under IEC 60529, IP65 means dust-tight protection and resistance to water jets, but it does not mean permanent immersion. Check seals after installation. For storage, IRENA reports that lithium-ion systems can exceed 3,000 cycles under controlled conditions. Compact solar lights commonly specify about 500–2,000 cycles, depending on depth of discharge, temperature, and charging quality. That range sounds precise, but field performance varies. A shaded panel, cold night, or loose connector can shorten it. Choose based on the site, not the box.

Choose by Brightness: 500–1,000 Lumens for Paths and Security Zones

Choosing all-in-one or split solar lights should begin with brightness, not appearance. For paths, 500–700 lumens usually provide comfortable visibility without making a garden feel harsh. This range can reveal uneven paving, steps, and wet surfaces after dark. I have found that spacing matters as much as output. A very bright light can still leave dark gaps between fixtures.

Security zones often need 800–1,000 lumens, especially near gates, garages, and side entrances. Higher brightness helps show movement and facial details, but excessive glare may reduce visibility. Aim the fixture downward and away from windows. Test the angle at night. It may look different than expected.

All-in-one models are simpler to install and suit open areas with strong sunlight. Split designs allow the solar panel to face the sun while the lamp covers a shaded doorway. This flexibility can improve charging during short winter days. Check the panel’s exposure, battery capacity, and expected runtime before choosing. A bright light that fades before dawn is not truly useful.

I once positioned a light beneath a tree and underestimated the shade. The first evening looked excellent; later nights were disappointing. That mistake changed my approach. Watch the site for a full day, then adjust the brightness and placement. Paths may need softer light, while security zones may justify the upper end of the range.

FAQS

What is an all-in-one solar light?

It places the panel, battery, controller, and LEDs inside one housing. Installation is faster, with fewer cables and roof penetrations.

When is a split solar light more suitable?

Choose a split design when the lamp needs shade but the panel needs sunlight. The panel can face the sky beside a doorway.

How can shading reduce solar light performance?

Even partial shade can sharply reduce charging output. A tree may cast afternoon shadows that a noon inspection misses.

What brightness suits garden paths?

About 500–700 lumens usually provide comfortable path lighting. This can reveal steps, uneven paving, and wet surfaces.

How bright should security areas be?

Gates, garages, and side entrances often suit 800–1,000 lumens. Aim the light downward to limit glare near windows.

Does higher brightness always improve visibility?

No. Excessive glare can hide details and create dark gaps elsewhere. Test the angle at night.

What does IP65 protection mean?

IP65 indicates dust-tight protection and resistance to water jets. It does not permit permanent immersion.

How long might the battery last?

Compact solar lights commonly specify about 500–2,000 cycles. Actual life changes with temperature, discharge depth, shade, and charging quality.

How should I choose between simple installation and placement flexibility?

Use an all-in-one model in an open, sunny area. Choose a split model when panel exposure and lamp placement must differ.

What mistake should I avoid during installation?

Do not judge the site from one midday visit. Watch shadows for a full day, then adjust placement and brightness. I underestimated tree shade once.

Conclusion

Solar lighting combines photovoltaic panels, batteries, controllers, and LED technology to provide efficient illumination without grid power. Modern PV modules typically convert about 15–23% of sunlight into electricity, while LEDs can deliver approximately 100–200 lumens per watt. What is the difference between All-in-One and Split solar lights? All-in-one models place the panel, battery, controller, and LED in one compact housing, making installation faster and cleaner. Split solar lights use a separate panel connected to the lamp, allowing the panel to be positioned remotely where it can receive four to eight peak sun hours, which is useful in shaded locations.

When choosing between them, consider installation space, sunlight exposure, weather protection, and maintenance. Look for IP65 or higher protection against dust and water, and evaluate battery durability, often rated for around 500–2,000 charge cycles. Brightness should match the application: 500–1,000 lumens is generally suitable for pathways, entrances, and security zones. Ultimately, all-in-one designs favor simplicity, while split systems offer greater flexibility for challenging environments.

Isabella

Isabella

Isabella is a dedicated marketing professional with a sharp focus on driving brand growth and engagement through strategic content creation. With an extensive background in digital marketing, she combines her passion for storytelling with her keen understanding of industry trends to deliver......